Magento Website Development in 2024:
Your 7-Step Guide
to Success
Magento Website Development in 2024:
Your 7-Step Guide
to Success
When is the right time to start Magento website development? The time is now! While you’re standing around and considering the ways to quickly set-up and launch Magento store, we’ve already prepared an insightful step by step guide for you.
Given that about 80% of Whidegroup clients use Magento as a base for their ecommerce businesses, we can shed some light on the:
So, it’s time to switch to the intricacies of a Magento store set-up, which still seems to be a painstaking process. In this detailed guide, we will show you the basics of Magento website development process, since it is the most popular free solution suitable for ecommerce startups, mid-sized businesses and enterprises.
The process of building a website with Magento consists of 7 steps that you’ll need to take. Every step requires a different level of knowledge. Therefore, very often a whole team of specialists (frontend and backend developers, UX designer, QA specialist, etc.) is engaged in the process of setting up a website. Of course, it’s up to you to decide whether you need to hire any specialist or not, but if you’re not well versed in the technical aspects of Magento website development, you just have to.
So, let’s see how to make a Magento website, install it and make it successfully running.
Table of Contents
ToggleThe choice of the best hosting is the first thing you should do before you create a new website in Magento and proceed with its configuration. The reason is that further steps will depend on the hosting plan and the provider you choose. Today, some providers specialize in Magento hosting that come with a one-click install of the platform. Sometimes such packages also include SSL certificate and/or free domain name.
Magento is a powerful platform, and therefore it has certain requirements to the server resources. In addition, the more your online store grows, the more server resources will be needed to maintain its smooth operation.
Here, you can find a full list of Magento technology stack requirements.
The best choice is always a Magento dedicated hosting as it gives you the ability to manage the whole server. What is more important, you will not have to share the hardware capacities with other websites hosted on the same server, which is the case with a shared hosting environment.
Here are some of the top-rated hosting providers that can support Magento stores:
For example, Cloudways has been satisfying ecommerce owners, SMBs, developers and agencies since decade. Cloudways is a managed Magento cloud hosting solution partnered with top cloud providers including AWS, Google Cloud Platform, DigitalOcean, Linode and Vultr.
With Cloudways you don’t have to worry about server management hassle because they offer optimized server stack with advanced cache for greater performance for Magento powered stores.
Features provided:
Generally, every hosting has its own advantages. So, you should revise every option and choose the one that fits you better than others.
To start a Magento website development, visit the official website and create an account (you can also do this at the download stage). The next thing you have to do is to choose the way you will get the latest Magento 2 version and install it. Generally, there are three options: Composer, Git, and by downloading a zip/tar archive.
On the download page you’ll see a detailed explanation for every option.

The Magento company itself, as well as we at Whidegroup, suggests that you use the first option, namely, the composer. As you can see on the screenshot, it gives a ton of advantages for Magento website developers and contributors allowing to:
Use the Magento software in a production environment, and much more.
So, let’s underline! Before we switch directly to the installation process, you must:
After this, you can get the Magento Open Source metapackage and create your new project with the Composer.
By the way, do not forget to pick up the brand domain name, which should be unique, simple, and catchy.
Now your store is ready for further customization and the next step is the configuration of a Magento store theme.
If you want your online store to attract more potential customers, the easiest way to do this is to set up an eye-catching, responsive, device-friendly theme that will attract user attention and thus, extend their sessions on your site. Since positive user experience is the number one priority for any online store, you, as the merchant, will definitely want to know how to change the default theme in Magento and what customization options you have.
When you set up your store, it comes with a theme already in place called LUMA. This theme features everything you need to start selling. You only need to change the logo and slightly customize the block images to make your store pages correlate with your brand and its values.

There are hundreds of free and paid custom Magento theme templates, premade by several different theme providers. You can easily find the latest editions of the templates made for narrow niches, as well as for massive industries, starting from cute themes for an online pet store to sleek, minimalistic templates for tech stores. You can access some of the greatest Magento themes on Magento Marketplace, TemplateMonster, and ThemeForest.
As for Whidegroup, we value custom Magento themes that don’t affect website performance, are easy to work with, and let the developers and store owners achieve the desired result for both website design and functionality. For example, Hyvä is one of our favourite themes to work with.

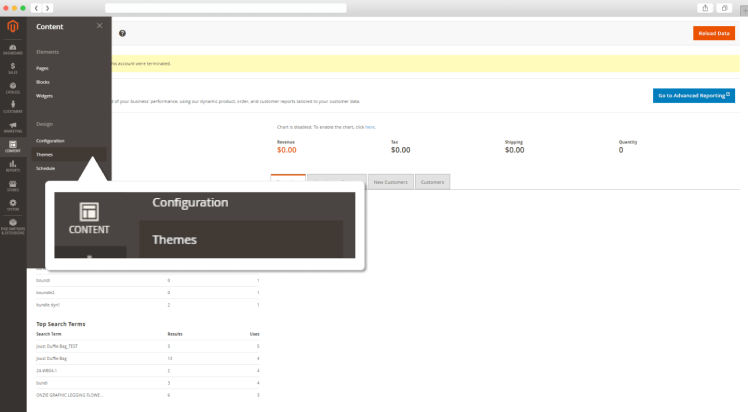
After purchasing and downloading your chosen theme, you can manage it in the “Content” section in the admin panel.
If the downloaded layout does not suit all your requirements to the front-end side of your online store and the template you’ve chosen leaves you feeling like something is missing, you can customize it anytime to make it fill the gaps.

If none of the theme templates satisfy your needs, even after slight layout customizations, then this is the only option you have left. Custom layouts built from scratch can correlate with the needs of your business at any given time, will serve to boost your ecommerce sales, and reduce bounce rates. One more thing – before you start working on the design of your store, make sure to do research on smart positioning of blocks, sections, and CTAs throughout your store.
Note that implementing major changes to the theme or development of a theme from scratch requires decent knowledge and expertise in programming. So, if you want to get a worthwhile result, you will likely have to look for qualified Magento development services.
No matter which of the four options you’ve chosen, sooner or later you will have to apply and activate a new theme. To do this, go to the Admin Panel > Content > Configuration > Edit > Select your theme in the drop-down menu > Save. There you go!

The next step in the Magento website development process is a product catalog configuration. Categories, subcategories, product pages, and easy navigation throughout your website is essential, as these are the most important components of any ecommerce website. They define the customer journey and entice customers to the desired products. You can look forward to experiencing no difficulties in managing product categories and subcategories in Magento. What is more, there are no limits on the number of products in your catalog.
The first step is to add new products to the store. Go to the admin panel. Select Catalog > Products. On this page in the future you will see all products that are already added to the catalog.
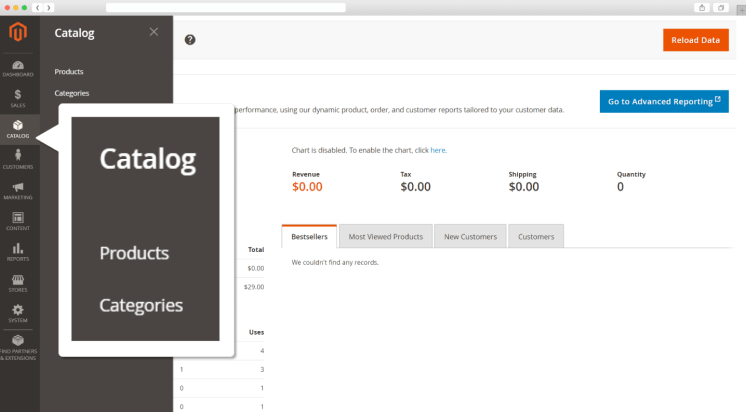
Thanks to the intuitive interface of the Magento admin panel, it is easy to add a product or create the first one, by way of clicking that big bright button on the right.
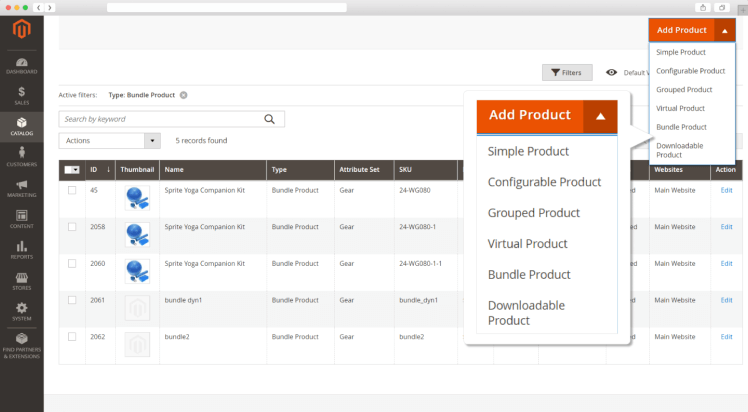
This button has a drop-down menu that lets you choose the type (simple, bundle, configurable, virtual, etc.) of the product to be created.
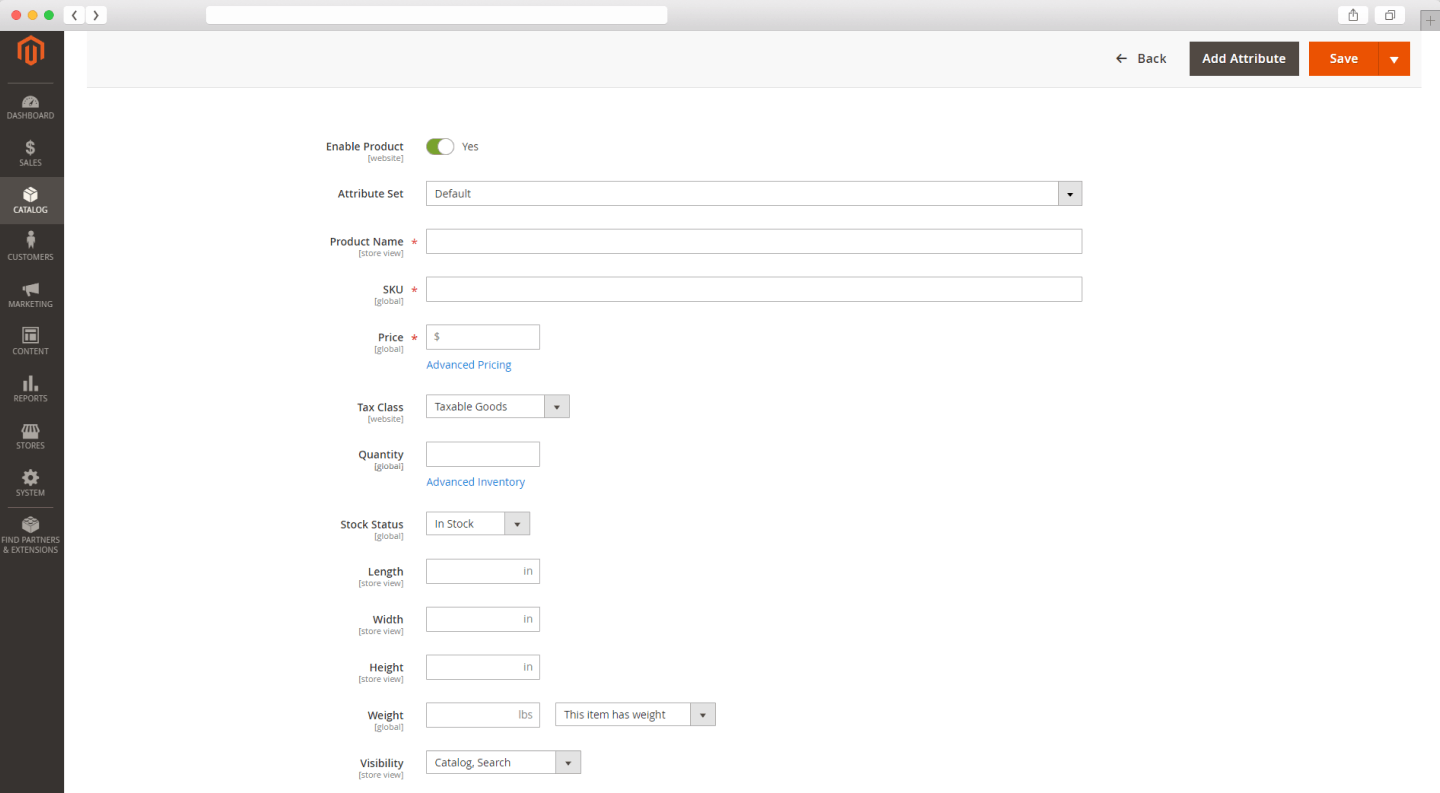
Here, you’re able to add custom options, import product images and videos, type in product details, add its SKU, price, add product attributes, and so on.
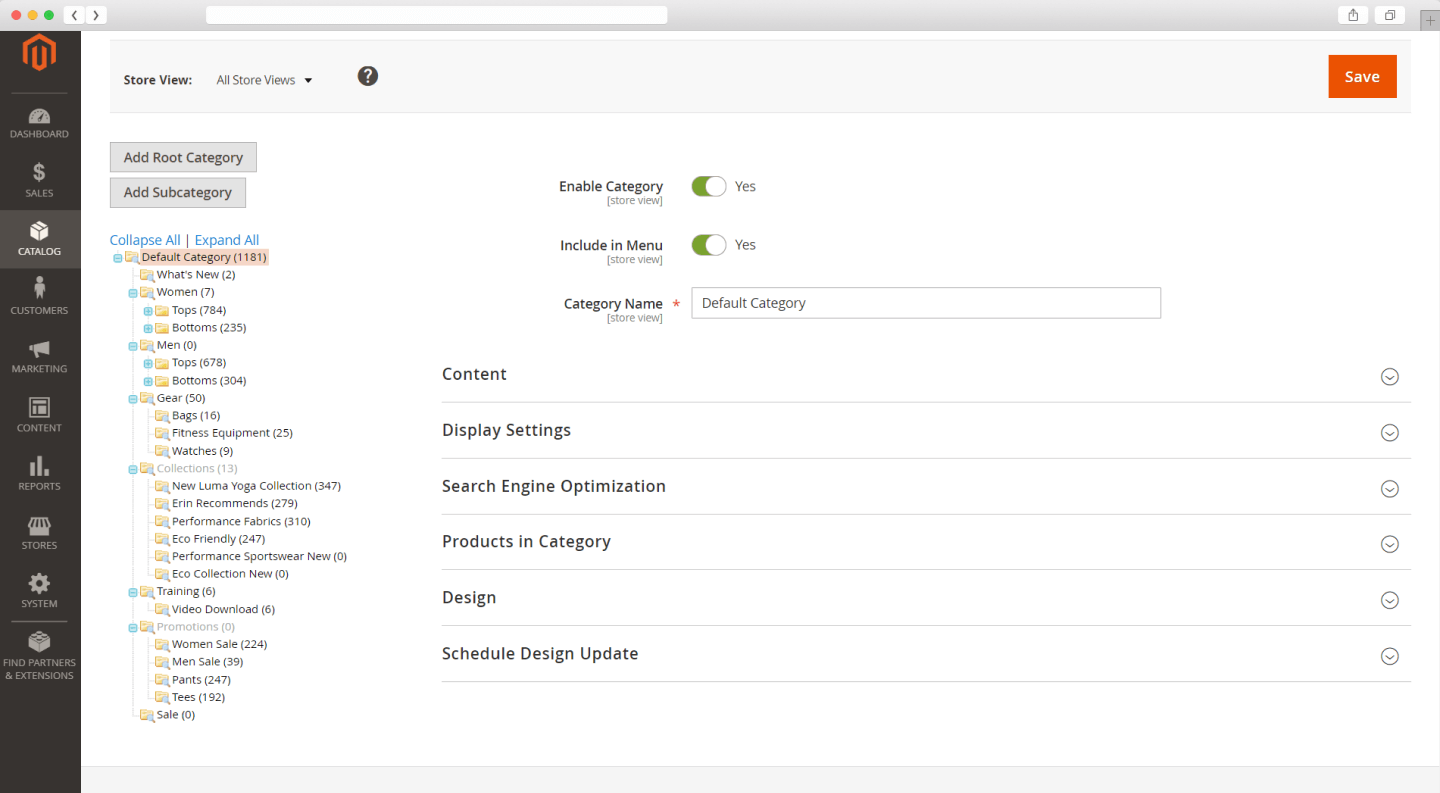
After that, it’s time to develop a skeleton of your online store – create categories and subcategories. In the admin panel select Catalog > Categories and add as many product categories and subcategories as you need to. One piece of advice: remember that customers should have the opportunity to get to any product page in no more than 3-4 clicks, considering the homepage was their point of entry to the website.
After you’ve tested the out-of-the-box features of the Magento store, you will most likely start looking for extra analytics, SEO, or accounting tools to integrate your store with. This is exactly what 80% of Magento merchants do, and this is where custom Magento extensions come to the rescue.
First, you should compile the list of features you want to enhance your store with. After that, you should look for the best Magento extensions available at Magento Marketplace. There, you will find Magento extensions to every taste and need, free and paid, and for almost any need that may arise in your imagination. If you want to improve your order management, customize the checkout, add more payment gateways, launch a blog, connect your store to the social networks, automatically optimize images, or more of that, look for the corresponding custom features there.

If the Magento Marketplace was not enough for your sophisticated ecommerce needs, we advise you to develop the needed extensions from scratch. In this case, as well as in the case of the theme development, you will need the assistance of experienced Magento developers who specialize in extension development.
At this stage, it is also important to decide on the shipping and payment methods.
Out-of-the-box, Magento allows you to set up different shipping options (go to Stores > Configuration > Sales). You can choose between simple and multi-shipping options, fix the conditions of free shipping (countries, minimum order amount, etc.), and flat rates. If you have clients with business accounts at shipping companies like USPS, UPS, FedEx, and DHL, you can connect them with Magento, maximizing their business benefits.
An ecommerce store is like a sandwich or cake consisting of several layers. These layers should be perfectly combined, comfortable and secure in order for customers to fall in love with your store. A robust payment gateway is certainly one of the crucial layers. Magento provides popular payment gateways like PayPal, Braintree, Klarna, and Amazon Pay, all out-of-the-box. If that’s not enough for you, today, most reliable payment gateways provide their own ways to integrate their API with ecommerce stores worldwide.
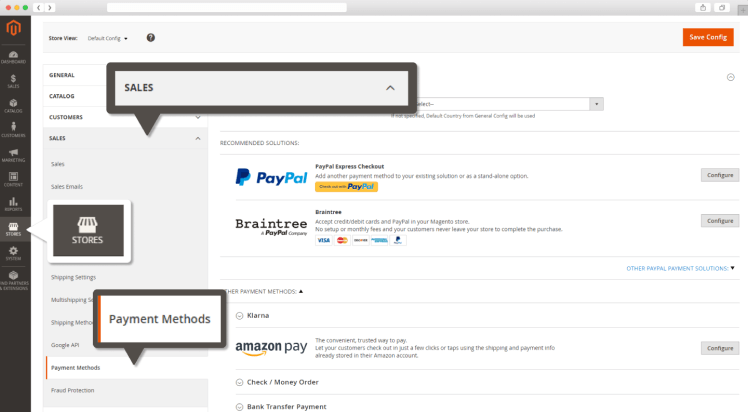
You can configure all of these features in Stores> Configuration> Sales. Besides, this section allows you to configure the checkout process and manage all shopping cart aspects.
When you’re done with the store functionality customization, it’s time to check if your new ecommerce store is ready to be launched.
After managing all the important development aspects, it’s time to test every inch of your future online store. This is where you need to perform quality assurance. This process should include:
Now that you’ve done all the previous Magento website development steps, made sure that everything is in its place, and filled the catalogs with your products, it’s time to go live!

Depending on the size of the project, implementation/deployment of the website may take up to several days. This step-by-step procedure requires time and necessary experience. Deployment also requires certain interactions on the server-side. If you lack technical expertise, this stage will appear quite complicated. So, if you have any doubts that you can manage the final step – better leave this task to the pros.

Of course, Magento does not require decent technical knowledge to be installed and initially managed. For a non-tech-savvy person, this process can take from one to several days. However, there is a “but”. Likely, you don’t want your website to be lost among competitors due to a lack of functionality or any performance issues you didn’t notice.
Without a deep knowledge of the platform structure and logic, you can’t make your website really stand out. Just confirm with yourself that you are comfortable with the necessary technology.
Here are several current requirements for Magento 2.3 development:
If you have the knowledge of at least a few of those technologies, great! If not, it will take you much longer to set up a base, customize, then launch a Magento store from scratch. In such a situation, the smartest decision is to hire a Magento developer or a team of developers who know how to create Magento website that will suit your personal and business needs.
Below, you’ll see a table showcasing all stages of custom Magento store development and the average hours required for its implementation by the Whidegroup team.
Development stage
Process description
Estimated hours
-/-
7-19
2-4
6 – 27
8-40
1-4
40-320
40-128
Coding
1-8
Setting up product details and attribute sets, cross-sell/up-sell products
1-4
Setting up payment and shipping method
8-56
Management of your project’s back-end and quality assurance
9 – 30
6-24
3-11 (+ 2-8h. For any necessary bug fixes)
3-4
As you can see, the professional development of a Magento ecommerce store can take between 47 and 686 hours. Note that it is impossible to precisely estimate the time frames before looking at the detailed project description. These estimates highly depend on several factors, from the number of products you are going to sell to the amount and complexity of custom functionality you want to integrate into a website.
The good news is that the Community Edition of Magento is totally free to download and use, so merchants receive neither monthly nor yearly bills for utilizing a Magento platform.
On the other hand, the list of associated costs during the development of the site will grow along with your requirements for the store’s design and custom functionality. In addition, there are several mandatory costs that will be included in the final check.
To find out what the Magento website development cost consists of, take a look through the pricing breakdown below.
Service
Cost
Type of the payment
Domain name
Cost
$10-$500
Type of the payment
Per year
Hosting
Cost
$10+/$120+
Type of the payment
Monthly/Annually
Extensions
Cost
$0-$500
Type of the payment
Per extension
Theme
Cost
$0-$200
Type of the payment
One template
Development
Cost
$50-$200
Type of the payment
Per hour
These are Magento essentials. Consequently, the longer the Magento website development lasts, the higher the overall price you will have to pay.
Starting an ecommerce business with Magento in 2024 is not an easy task. However, to beat the tough competition, easily adopt new technologies and trends, and make up for a lack of knowledge in ecommerce – you only need to opt for the right ecommerce tools and find the right people to help you.
All in all, Whidegroup’s development team not only knows how to create a Magento website, but also advise you on the best solutions and manage your site so you get more sales and boost conversions. With that said – we look forward to hearing your thoughts in the comment section or by sending us direct messages through our contact form!
Share This Article

 How to Build an Ecommerce Website From Scratch in 2024: An A to Z Ecommerce...
I simply want to tell you that I am just beginner to blogs and seriously loved this blog site. Probably I’m planning to bookmark your website . You surely come with superb well written articles. Bless you for revealing your web-site.
Im grateful for the article.Thanks Again. Much obliged.